Dish Rack, Sliding
To some, this might be a laughable project but I've been surprised at the light bulbs going off (Idea Time!!) when anyone has seen this aboard our boat.
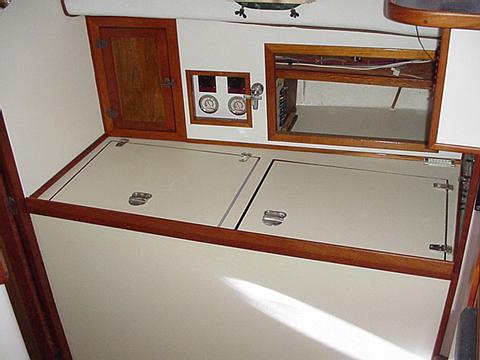
The only place to put dishes after washing them in our double basin sink, was either in one of the basins, or next to the sink, atop the garbage bin. Atop the bin, the dishes would have to be moved to throw anything in the garbage and after meals, that would be the norm. It seemed inconvenient to me to have to move anything to get to the garbage.
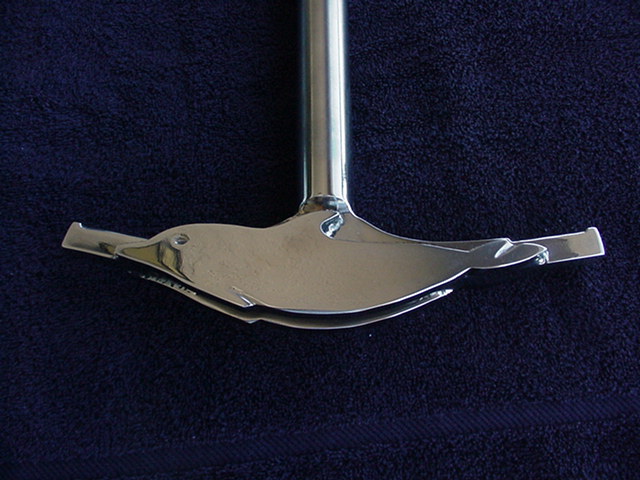
I was thinking of how to put a dish rack above the sink or garbage bin aboard our boat for some time, but couldn't quite figure it out until one day in the mail came a high end brochure for items no one really needs. You know, that type of brochure with garbage on the rich and famous would buy from. Paging through it I stopped upon a stainless steel 18/8 polished dish rack from Italy. It came with a drip pan as well. It looked refined but strong enough to be aboard and I like stainless. I thought it could work somehow for my dish rack project, so ordered one. The price was $159. plus shipping. A lot for a dish rack, but I thought it could be the key to my still sketchy design thoughts.

When delivered, I immediately took it to the boat and over a couple of beers, figured out I had enough room to install it over the garbage bin................and then the Light Bulb lit in MY brain! I had been moving the new rack left and right to see where and how I could mount it on the bulkhead and "That" was the answer! Move it Left and Right!! Bingo!!!
With paper and pencil I whipped up a drawing with measurements of 2 triangular supports needed for the base drip pan. I could have just screwed these triagular supports to the bulkhead, but making it slide left and right, allows me to move the rack out of the way of the garbage bin. This is essential to be able to remove the bag of garbage from the bin! To remove garbage, slide the rack to the right/over the sink, lift off the lid to the bin and remove the bag of garbage. When new bag is inserted, replace the lid and slide the dish rack left...back into position.
(The triangular base is actually two triangles, One piece bent in the center so that there is one triangle on the side and one against the bulkhead) This of course for each aft corner of the drip pan.
I set up the bar/tube out of 1" s.s. tubing with a hole drilled in my galley locker on the left(outboard) end and a small bracket on the right side, screwed to the bulkhead. To slide the rack, lift gently just a hair and the whole assembly slides l. or r. Stop lifting and the triangular base(with felt tabs behind) rests on the bulkhead and there is enough friction there that I have never had to wory about the rack moving, even in a serious sea. It might move a few inches, but that's it and I could always drill a hole in the tube for a stop pin or a clamp type device.
Anyway, the end product works well. Note, I also had 2 small 1/4" drain tubes welded into the back/bottom corners of the drip pan, one each side. Underneath the pan, I slipped on 1/4" clear plastic flexible tubing with a plastic T fitting between. From the 'T' a length of tubing runs directly into my sink basin. Any water dripping off dishes, drips into the pan, then left or right and down through a tube, down into our sink.
One last thing and it was an afterthought. After we had used it a bit, I realized that lifting a corner of the garbage lid to toss anything in could be simplified. If you notice, I cut a hatch into the top of the OEM garbage lid, installing a piano hinge to the side of it, adding a handle on top. Now, a simple lift of the brass handle allowed me plenty of space to toss garbage in and we would not have to lift the whole lid up high enough to access the bin.
15 years now and it still works perfectly!


No comments:
Post a Comment